

CGM Sensor Application Guide
Continuous glucose monitoring can make daily diabetes management more visible, convenient, and data-driven. A CGM sensor is a small wearable device that tracks glucose trends in the interstitial fluid under the skin and sends readings to a compatible receiver, smartphone app, or insulin delivery system.
This guide walks you through a safe, practical approach to cgm sensor application so you can feel more confident using wearable glucose monitors at home.
Before You Start: Know Your Device and Your Plan
A CGM system typically includes:
- A sensor that sits on or just under the skin
- An applicator used to place the sensor
- A transmitter or built-in communication component, depending on the model
- A receiver, smartphone app, or connected insulin pump
- Adhesive that helps the sensor remain in place during wear
Your clinician may recommend continuous glucose monitoring to help identify glucose patterns, reduce fingerstick burden when appropriate, support medication decisions, or improve awareness of highs and lows. However, a CGM does not replace individualized medical guidance. If your symptoms do not match your CGM reading, or if your device instructs you to check with a blood glucose meter, follow the instructions in your user guide and your clinician’s recommendations.
Step 1: Gather Your Supplies
Set everything out before you open the sensor package. This helps reduce contamination risk and keeps the process calm and efficient.
You may need:
- Your CGM sensor and applicator
- A transmitter, if your system uses a separate one
- Your compatible receiver, smartphone, or pump
- Alcohol wipe or the skin preparation method recommended by your device instructions
- Soap and water
- Clean towel
- Optional adhesive patch or overlay, if recommended for your device
- Sharps container or safe disposal container, if required by your applicator instructions
- Device user guide or quick-start instructions
Check the sensor packaging before use. Do not apply a sensor if the package is damaged, opened, expired, wet, or appears contaminated. If you are unsure, contact the manufacturer or your medical supply provider before using it.
Step 2: Choose the Right Sensor Site
Sensor placement matters. The correct site depends on the CGM system, age of the wearer, body type, and device labeling. For example, some systems are commonly worn on the back of the upper arm, while others may allow additional sites such as the abdomen or upper buttocks for certain users. Dexcom notes that sensor placement is important and recommends changing the insertion site with each sensor. (dexcom.com) ↗
In general, choose an area that is:
- Approved in your device’s instructions
- Flat enough for the sensor adhesive to make full contact
- Easy to reach or accessible with caregiver help
- Away from waistbands, tight sleeves, compression areas, and seat belts
- Away from scars, stretch marks, moles, tattoos, bruises, irritated skin, or recent injection sites
- Unlikely to be bumped during sleep, exercise, work, or daily routines
Avoid placing a sensor where pressure is common. Lying directly on the sensor can sometimes affect readings or comfort. If you have sensitive skin, adhesive reactions, or a history of skin irritation, talk with your healthcare professional before applying a new sensor.
Step 3: Wash and Dry Your Hands
Clean hands reduce the chance of transferring oils, lotions, dirt, or germs to the sensor adhesive or application site.
To prepare:
- Wash your hands with soap and warm water.
- Scrub thoroughly, including fingertips and under nails.
- Rinse well.
- Dry with a clean towel.
Do not handle the adhesive surface more than necessary. Oils from your fingers can weaken adhesion and make it harder for the sensor to stay in place for its full wear period.
Step 4: Prepare the Skin
Good skin preparation is one of the most important parts of successful cgm sensor application. The skin should be clean, dry, and free of lotion, sunscreen, body oil, perfume, or sweat.
Follow these steps:
- Wash the selected site with soap and water if needed.
- Dry the area completely.
- Use an alcohol wipe if recommended by your device instructions.
- Let the site air-dry fully before applying the sensor.
Do not blow on the site to dry it. Breath can introduce moisture and bacteria. Do not apply the sensor while the skin is damp. Moisture under the adhesive can increase the chance of early lifting.
If you showered recently, exercised, or were outdoors in hot weather, wait until your skin is fully dry and cool. Applying a sensor to warm or sweaty skin may reduce adhesive performance.
Step 5: Open the Sensor Package Carefully
Open the sensor packaging exactly as directed by the manufacturer. Some systems require assembling the sensor and applicator. Others come as a preloaded, single-use applicator.
As you open the package:
- Keep the applicator on a clean surface.
- Do not touch the insertion needle or sensor filament.
- Do not press the applicator button until it is placed against the skin.
- Confirm that the sensor code, serial number, or pairing information is available if your device requires it.
Some CGM systems use a sensor code to support calibration-free use, while others may require no code or use automatic pairing. Follow your exact device workflow. If you skip a required code or enter it incorrectly, your system may not perform as expected.
Step 6: Position the Applicator
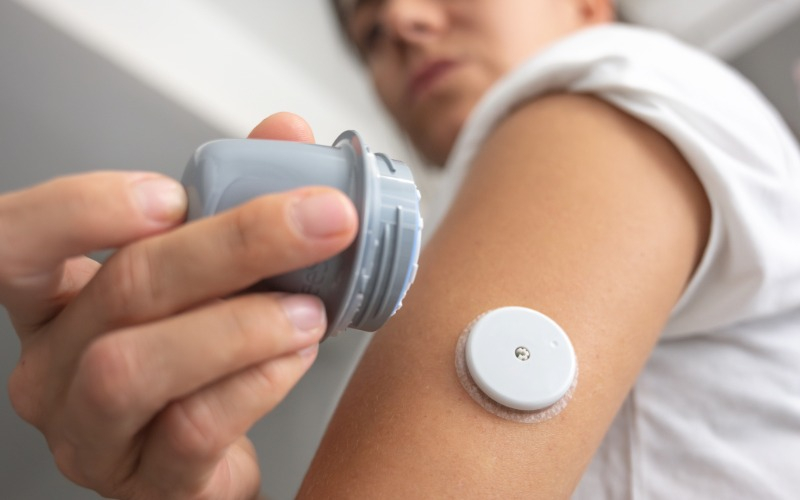
Hold the applicator firmly against the selected site. The adhesive should sit flat on the skin without wrinkles or gaps. If you are applying the sensor to the back of your upper arm, it may help to use a mirror or ask a caregiver for assistance.
Before insertion:
- Relax the muscle near the application site.
- Keep the applicator steady.
- Avoid twisting or sliding the applicator once it touches the skin.
- Make sure clothing is out of the way.
If the device instructions say to press, twist, unlock, or remove a safety cap, complete those steps only when you are ready to apply the sensor. Applicator designs vary, so do not rely on instructions from another CGM brand.
Step 7: Insert the Sensor
When the applicator is positioned correctly, activate it according to the user guide. Most applicators insert the sensor quickly with a button press or similar action. You may feel pressure, a quick pinch, or mild discomfort. Many people find the process easier after the first few applications.
After insertion:
- Hold the applicator in place for the amount of time recommended by your device instructions, if specified.
- Gently remove the applicator from the skin.
- Check that the sensor remains attached.
- Press around the adhesive edge if your instructions recommend it.
- Dispose of the applicator safely according to the user guide and local requirements.
A small amount of brief discomfort can occur. If you experience severe pain, ongoing bleeding, swelling, signs of infection, or a sensor that appears improperly inserted, remove the device if instructed and contact your healthcare professional or the manufacturer for guidance. FDA safety summaries for CGM systems note that possible insertion-related effects can include local infection, inflammation, pain, bleeding, bruising, itching, tape irritation, and other skin-site issues. (accessdata.fda.gov) ↗
Step 8: Attach or Pair the Transmitter, If Needed
Some wearable glucose monitors have a separate transmitter that snaps into the sensor housing. Others have the transmitter built in. If your CGM uses a separate transmitter, make sure it is clean, compatible, charged if applicable, and seated correctly.
Then pair or start the sensor session using your app, receiver, or pump. Depending on the system, you may need to:
- Enter or scan a sensor code
- Scan the sensor with your phone or reader
- Confirm the transmitter serial number
- Start a new sensor session
- Wait for a warm-up period before readings appear
Keep your receiver or phone nearby during startup. Make sure Bluetooth is enabled if your system requires it, and confirm that your phone operating system and app version are compatible with your CGM system.
Step 9: Secure the Adhesive
Once the sensor is in place, check the edges of the adhesive patch. Smooth the adhesive against your skin if your instructions allow it. Avoid tugging on the sensor housing.
To help the sensor stay on:
- Wait before showering or intense exercise if your device instructions recommend it.
- Avoid applying lotion or oil near the adhesive.
- Pat the sensor dry after bathing instead of rubbing it.
- Wear loose clothing over the sensor when possible.
- Consider an approved overlay patch if you sweat heavily, swim, exercise often, or have trouble with adhesive lifting.
If you use an adhesive patch, make sure it does not cover openings or components that the manufacturer says must remain uncovered. Use only products that are compatible with your device and skin.
Step 10: Confirm Readings and Alerts
After the warm-up period, confirm that your CGM is displaying readings, trend arrows, and alerts as expected. Review your alert settings with your healthcare team, especially for low-glucose and high-glucose alerts.
A CGM reading may lag behind a fingerstick blood glucose reading, especially when glucose is changing quickly. If you feel symptoms of low or high blood sugar but your CGM does not match how you feel, use a blood glucose meter if recommended by your care plan or device instructions.
Also check that data sharing is set up correctly if a caregiver, parent, clinician, or care partner monitors your glucose remotely. Continuous glucose monitoring can be especially helpful when the data is reviewed regularly and used to guide conversations with your care team.
Step 11: Protect the Sensor During Daily Wear
A CGM is designed for daily life, but it still needs practical protection.
During the wear period:
- Avoid bumping the sensor on door frames, gym equipment, backpacks, or seat belts.
- Be careful when changing clothes.
- Pat dry after showers or swimming, if your device permits water exposure.
- Avoid scratching around the adhesive.
- Check the site daily for redness, irritation, swelling, drainage, or discomfort.
- Rotate sites with each new sensor to reduce skin stress.
If the adhesive begins to lift, follow the manufacturer’s guidance. Do not try to reinsert a sensor that has come out. If the sensor falls off early, contact the manufacturer or your supply provider to ask about replacement options.
Step 12: Remove the Sensor Safely
When the sensor session ends, remove it gently. Pulling too quickly can irritate the skin.
To remove:
- Wash and dry your hands.
- Lift one edge of the adhesive.
- Slowly peel the adhesive back over itself.
- Use an adhesive remover if appropriate for your skin and device guidance.
- Wash the area with mild soap and water.
- Inspect the skin.
- Dispose of the sensor according to the manufacturer’s instructions.
Allow the skin to recover before using the exact same location again. Rotating sites helps reduce irritation and gives your skin time to heal.
Troubleshooting Common CGM Application Problems
The sensor will not stick
This is often related to moisture, lotion, sweat, or incomplete drying. For the next application, wash and dry the site carefully, avoid skincare products near the area, and apply the sensor when your skin is cool and dry.
The sensor hurts after application
Mild tenderness may improve, but significant or worsening pain should not be ignored. Check the site. If you notice swelling, bleeding, warmth, drainage, or severe discomfort, follow your device instructions and contact a healthcare professional.
Readings are not appearing
Check that the sensor session was started, the device is paired, Bluetooth is on, and the receiver or phone is within range. If the app displays an error message, follow the on-screen instructions or contact manufacturer support.
The adhesive irritates your skin
Skin reactions can occur with medical adhesives. Ask your healthcare team about skin barrier options, alternate approved sites, or hypoallergenic approaches that are appropriate for your device. Do not place barrier products in a way that interferes with sensor insertion unless your clinician or device instructions confirm it is safe.
The sensor falls off early
Do not reuse it. Start a new sensor if appropriate and contact the manufacturer or supply source for help. If early sensor loss happens repeatedly, review site selection, skin preparation, activity patterns, and overlay patch options with your care team.
When to Contact Your Healthcare Team
Reach out to your clinician if:
- You are unsure where to apply the sensor
- You have repeated inaccurate readings
- Your symptoms do not match CGM readings
- You have frequent low or high glucose alerts
- You notice skin infection signs or worsening irritation
- You need help adjusting alert settings
- You are starting a new medication, insulin plan, or exercise routine
- You are applying a CGM for a child, older adult, or dependent patient
Your care team can help interpret CGM trends and connect your readings to meals, medication timing, activity, stress, sleep, and illness.
Quick CGM Application Checklist
Before each new sensor, confirm that you have:
- Read the instructions for your specific CGM model
- Checked that the package is intact and not expired
- Selected an approved, clean, dry site
- Washed and dried your hands
- Prepared the skin properly
- Applied the sensor with the correct technique
- Started the sensor session in the app, receiver, or pump
- Confirmed alerts, pairing, and warm-up status
- Stored backup supplies where you can access them
Keep Your CGM Supplies Ready
A consistent CGM routine depends on having the right sensors, transmitters, adhesive supports, and compatible accessories on hand when you need them. Running out of supplies can interrupt your glucose visibility and make diabetes management more stressful.
If you are due for your next shipment or starting continuous glucose monitoring for the first time, visit our CGM supply order page ↗ to request the supplies recommended for your prescribed system. Our team can help you stay organized, avoid gaps between sensor changes, and keep your wearable glucose monitoring routine on track.




0 comments